Tuesday, March 22, 2011

Victorian Ale Jelly

This is a classic Victorian recipe that is given in both it's original 1859 version, and in a modern revision.  See below for directions on the jellied stock required for this recipe. 

I'm posting this for entertainment purposes.


1874 Advert


Original:

To the prepared stock or jelly add (where the shape is large), a pint bottle of strong ale, a pound of loaf sugar, the peel of one, and the juice of four lemons, a stick of cinnamon, and the beaten whites of eight eggs;

put all into a saucepan, stir it thoroughly;

let it boil for fifteen minutes, and pour into a jelly bag till it runs perfectly clear.

Ale, 1 pint; sugar, 1lb.; lemons,peel of 1 and juice of 4; cinnamon, 1 stick; eggs, 8 whites.


Jellied Meat Stock


Revision:

Ingredients:

2 liters jellied stock  (8.5 cups, 1lb)
600ml strong ale  (ample 2.5 cups)

450g loaf sugar   (4.5 cups)

pared zest of 1 lemonjuice of 4 lemons

1 cinnamon stick8 egg whites

Ale Jelly Preparation:Add the jellied stock to a pan and gently melt then stir in the ale, sugar, lemon zest and cinnamon stick.

Beat the egg whites in a bowl until foaming then stir into the stock mixture in the pan.

Bring the mixture to a boil, stir well to combine then continue boiling for 15 minutes.

Take off the heat and allow to cool slightly then pour into a jelly bag or into a fine-meshed sieve lined with a double layer of muslin.

Allow to drip through then pour the liquid into a mould.

Set aside to cool then refrigerate until set.


 * * * * * * * * * * * * *

How to Make: Jellied Stock
Raised pies such as pork pies, meat and fruit pies, or French-sytle pâtés often require a jellied stock as part of their ingredients. Jellied stocks are made from animal feet which are cooked slowly so the collagen in the connective tissue breaks down and helps 'jellify' the stock in which the meat is cooked.


Ingredients:
2 pigs' trotters (for pork stock) or 1 calf's foot and 1 knuckle of veal (for a veal stock)
6l water (3l for each trotter added)
1 slice lean bacon
1 onion
12 black peppercorns
2 blades of mace
4 allspice berries
2 thinly-pared strips of lemon zest
1 bouquet garni
carcass of the meat you are using (eg chicken, hare, rabbit, venison etc)
(if making a port-flavoured stock 200ml port wine)
salt and freshly-ground black pepper, to taste


Preparation:
Split the trotters and wash thoroughly (this helps get the maximum amount of collagen out).

Combine all the ingredients (except the port, if using) in a large pan then add the bones of the meat you are using for your pie.

Bring to a simmer and continue simmering for about 3 1/2 to 4 hours.

Take the mixture off the heat then strain through a fine-meshed sieve lined with muslin.

Transfer the resultant liquid to a clean pan, bring to a boil and continue boiling until the mixture has reduced to about 500ml.

If making a port-flavoured stock add the port wine at this point and reduce back down to 500ml.

Adjust the seasoning to taste then allow to cool slightly before pouring into a raised pie.

The stock can also be poured into small pots (about 60ml), allowed to cool and frozen for later use as the basis for a sauce or a a stock for a meat stew or casserole.

Tied up trotters in Spain

Monday, March 21, 2011

Fabric Framed Cork Board

Natalie, over at her "Johnny in a Dress" blog, posts a wonderful demonstration
 for this darling cork board. 
I've just got to try this and share it with you!

And I know just the spot. 
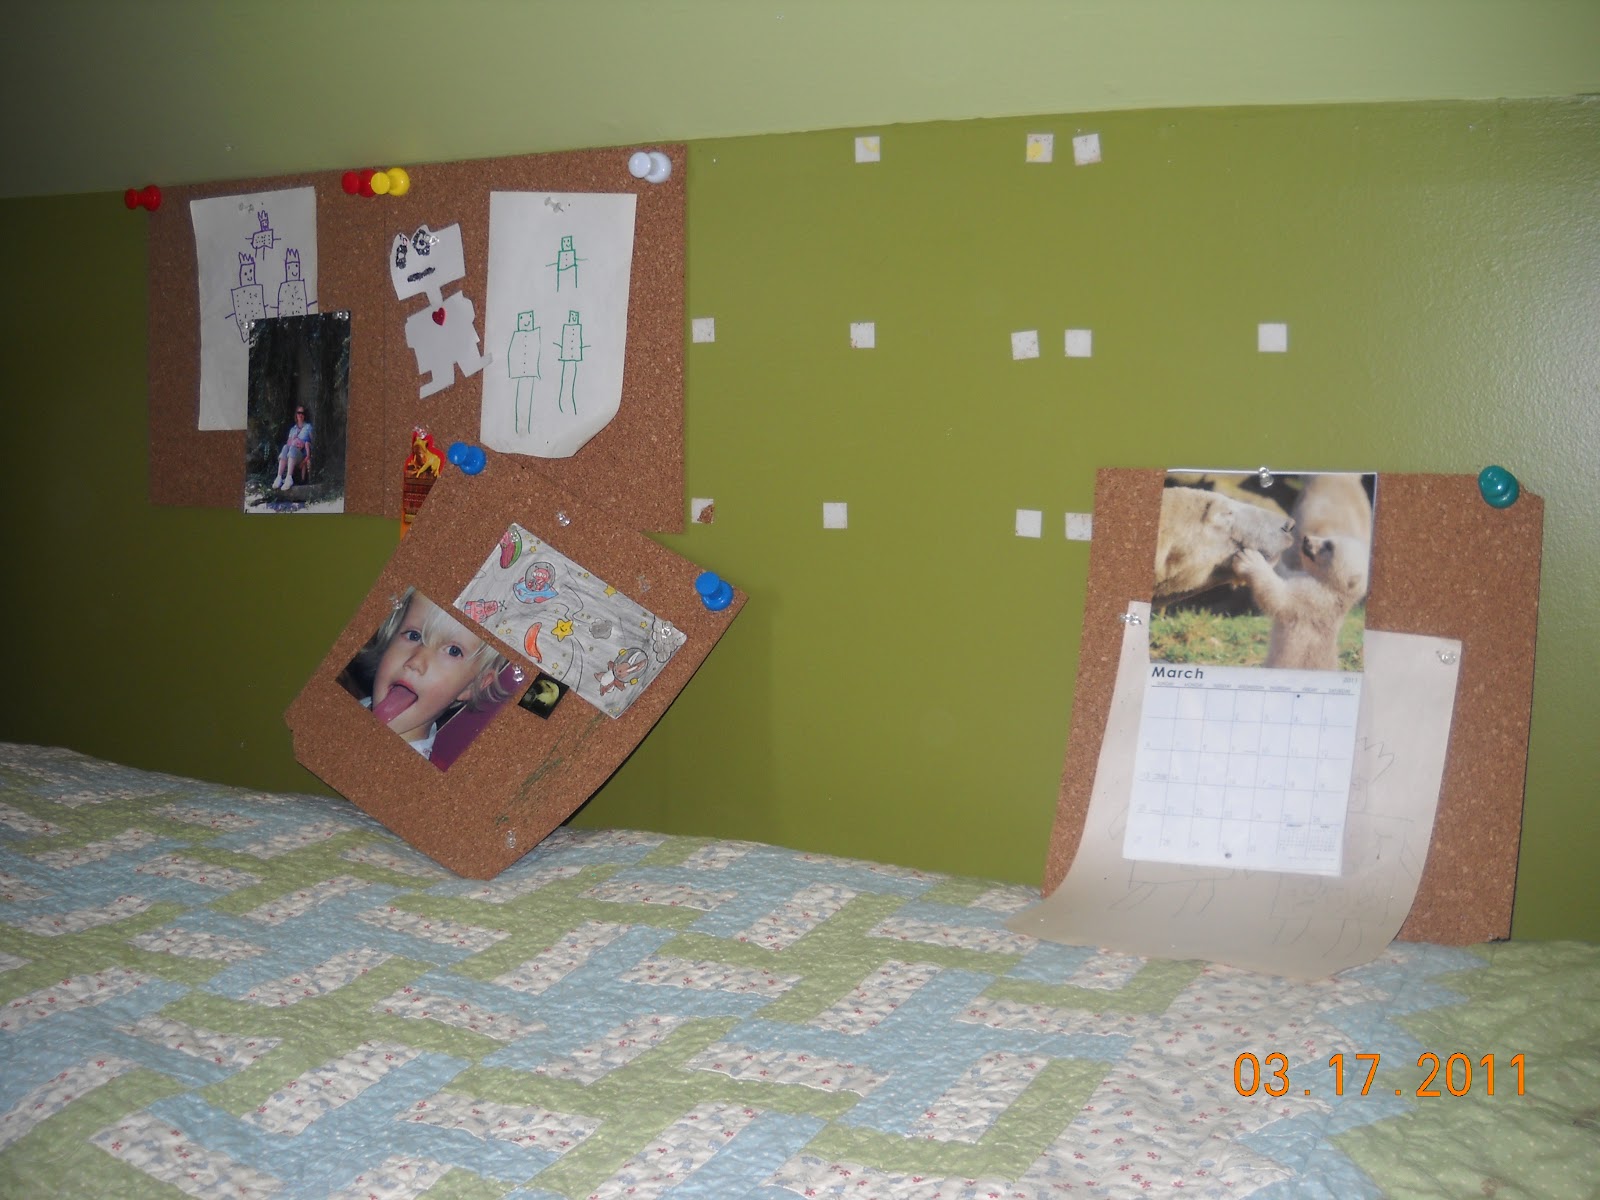
Upstairs in my 5-yr-old's room I had the brilliant idea
 to tack up a package of these cork sheets. 
You've seen them, they come with their own two-sided foam stickers
 to help you complete the project.

Great idea for fun photos, various projects, and all the wonderful creations
 that we can't bear to throw away.


One problem...


The foam tape sticks very well to the wall, but not so well to the cork.


Enter Natalie's even better idea! 
I knew just the frame to use. 
I picked out some fun fabrics and starched the living daylights outta them. 
I want to discourage sags and wrinkles.


I'm using the same cork sheets that I removed from the wall. 
Measure them to fit.  Double the thickness
(It bugs me when there isn't enough room for the pins). 

Be sure to keep them a tiny bit smaller than the frame backing. 
Take my word here, I had to re trim mine because it was too big and wouldn't fit. 
With the trim it fit nice and snug.


Whatever you use to tack your fabric down, bring the corners in first. 
I used our old stand-by so that I could more easily change the fabric in a few years when the polka dots are "stupid."  (This is my fifth child, I'm trying to be prepared.)


Tuck your fold in to prevent wrinkles and help keep things pulled taught.


At the last minute I decided to add a pocket. 
After starching this, too, I folded it in half
and wrapped it around along with the other fabric.


Well, we won't be seeing the back.


Coincidentally, we chose St. Patrick's Day to work on our boy's green wall. 
It's not your monitor, we're really all green.


We had some difficulty removing all that terrible sticky tape. 
Honestly, what ended up working best was scraping with pocket knives,
then rubbing with nail polish remover
(there goes my daughter's perfect green manicure.)


Naturally, the paint rubbed off a bit, too. 
But the awful tape was gone!  Hallelujah! 
All that was left was a little wash, sand, and another wash. 
Then with one coat of paint
 you'd never know there was such a chaos on this poor little wall.


And with a huge "Thank You" to my children
 for helping me with this longer-than-expected project,
 our youngest member of the family still has a place for his creations.
  Nice and tidy.

Perhaps he'll be needing another.


Sunday, March 20, 2011

Capris From "High Waters"

I spotted this on a site called "One Hot Crafty Mama."  I was so impressed with her idea, and the way she applied it, that I had to try it out for myself.  

I just wanted to offer a few extra directions.  My daughter was eager to help, mentioning it would make a good 4H project.  Good thinkin'!


1.  Trim "high water," or holey-knee pants to desired length


2.  Cut four 4 x 22" strips
 We figured the strips of fabric needed to be wide enough to be folded in half, with an ample stitch allowance for the gathered ruffle.  For this, our first project - our prototype - we decided on 4 x 22 inches.  It just looked good on the cutting mat.

3.  Join together
 We'll want a continuous ruffle around each leg, so we join two strips together.  Now we have two 4 x 44 inch strips.

4.  Sew together into a long tube
 Our ruffle will be "right side" on both sides, so we sew a long, skinny tube.  The finished tube will be 1.5 x 44 inches.  Turn the rough ends in, but don't stitch.


5.  Turn out and baste along stitched edge, iron


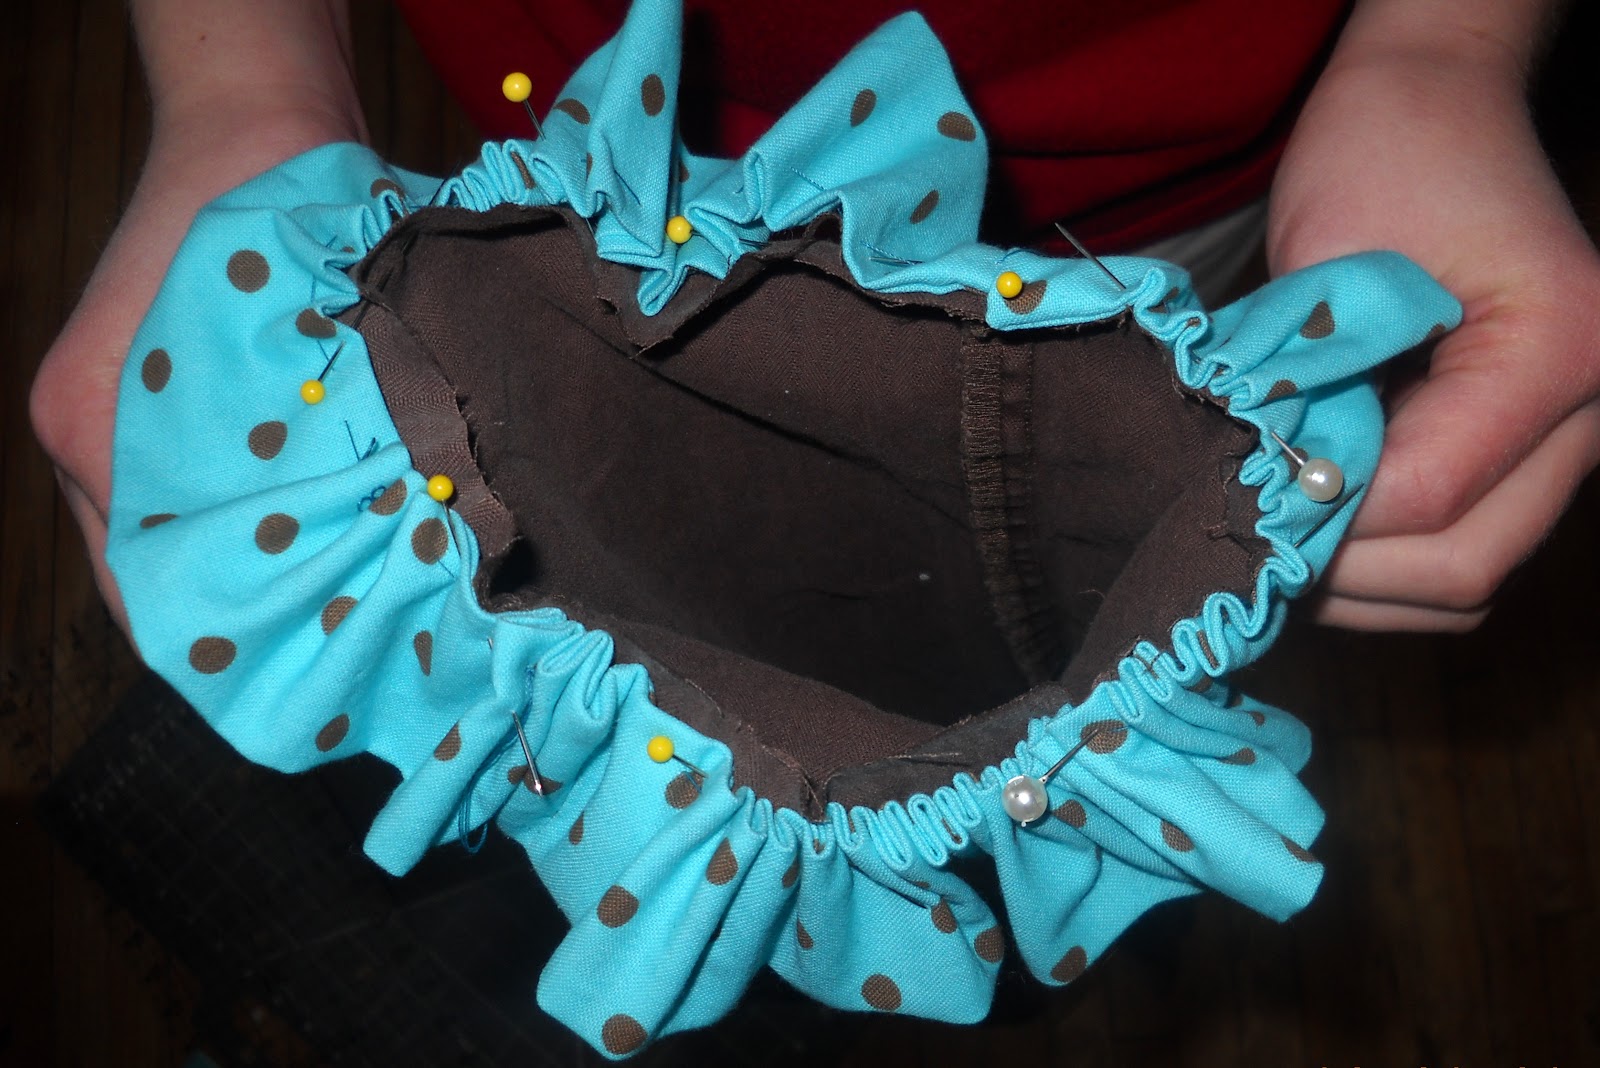
6.  Gently pull basting stitch to ruffle your fabric tube, then pin to the outside edge of pant leg, as shown


This is where the project can get a bit "hairy."  Take your time and don't be in a hurry. 

Keep things as even as you can, remembering that imperfections will be hidden in all the gathering.  You'll also be sewing around again. 

Tuck one turned-in end inside the other and flatten smooth.  Pin these together near, but not onto the inner seam.  You may tack these shut at the end of the project, if you wish, but the very small opening should not cause a problem.

Use pins to hold the bunchy ruffle down, and stitch slowly.  NEVER sew over a pin with your machine.

7.  Stitch twice around to sew the ruffle


8.  Stitch twice, evenly, around the outside of pant leg to hold ruffle flat and down

This last part is important in order to hold the ruffle in place, and keep the inside bulk to a minimum.  Also gives a nice, finished look.

Before
(Blogger didn't wish to print upright)

After
 These are my daughter's new carpi's, and she absolutely loves them!  She picked the color for the ruffle, and has lots of matching shirts for them.  Now she can't wait to wear them to school!

Posted on The Shabby Nest's Frugal Friday 3-26-2011.

Popsicle Stick Easel

I had these jumbo sized popsicle sticks left from a chore jar that I had made for the kids.  Something to help them earn a little extra money, something that sat around collecting dust.


Sooo ... instead of writing up some more job ideas that would never get done, I thought this looked like a fun, positive way to use up some sticks.

With four sticks, one set aside for the ledge, I taped the other three together. 


Electrical tape or duct tape would work well for this as they come in many colors and offer some stretch.  I used some 20-yr-old photography tape from my art school days.


Go ahead and gently bend the easel into position.  Hopefully you can see in my next photo that I have a strip of tape hanging from the back side of the front part of our easel.  I've carefully attached another piece to about one-third of the way down so that there would be no exposed sticky tape.


For the ledge I used super glue.  I love the stuff, it sticks right on there and won't come apart.  That applies for both straight and crooked ledges.  Of course you can use hot glue, which is more forgiving.


The site on which I found this project, Family Fun (I LOVE this site!) suggests that you use regular glue, then simply hold your ledge in place with a pencil. 


Lastly, I trimmed a piece of card stock to a diminutive size, then it was time for my little Picasso to create his masterpiece.


April Fools Treats

It's time for us to prepare our little April Fools Tricks.  Here are a couple of fun ideas.  What are some of your favorites?  Leave your comment!

Faux French Fries
Replace a classic salty snack with a little something sweet: Sugary Fake Fries.
1 package of plain, prepared bread stick dough
kitchen scissors
sugar
white envelope
seedless strawberry jam

1. Begin by unrolling the dough and separating the bread sticks.
2. Use kitchen scissors to cut them into ¼ -inch-wide sticks.
3. Roll all the sticks in sugar, then bake on cookie sheet according to package directions or until golden brown (approximately 8 min.) Leave them on the tray until they’re cool.
4. Put the “fries” into the cutoff end of a sealed envelope about 2 ½ in. deep.
5. Serve with a side of “ketchup”: seedless red jam whisked to a smooth consistency.


Chicken Nugget Chuckle

Your guest might not get the joke until their first bite! This recipe is for banana bites.

Banana
Peanut Butter
Honey Graham Crackers
Seedless Strawberry Preserves

1. Cut and shape banana slices into nugget shapes.
2. Cover with creamy peanut butter.
3. Coat with finely crushed honey graham cracker crumbs.
4. Serve with seedless strawberry preserves.


Posted on The Shabby Nest's Frugal Friday 3-26-2011.

Saturday, March 19, 2011

Name Quilt

I made this quilt for the baby of a good friend some seven years ago.

The ladies in my quilting group are blessed with fabric donations from time to time, of which we are happy to share.
This darling boy quilt was made with some of these precious donations.
I mixed it up with other "masculine" type fabrics.

With such fun fabrics all I needed was to organize decent sized squares together.  I wanted a little something more, however.


We bounced some ideas off one another,
a great reason to be a part of a crafting group. 
Looked at several books, another benefit of membership.
Ultimately, we came up with piecing the letters for his name.
A variety of greens, on hand, became the color of choice for the little guy's name.


I wish I could remember the names of the books from which I'd gotten the patterns, both for the letters and for the frog prince.  If I recall correctly, it was two different books.


For a time, a few of us had dabbled in paper peicing.  Some of you may remember the method from not so long ago, perhaps you too harbor yet unused patterns.


This is only one of many paper piecing pattern books


Both the frog prince and the letters were paper pieced.
The frog prince pattern came from one book, the letter patterns from another.

Books like these are out there, most with clear and simple directions.

Your library is a great resource. 
They offer lending from other counties if yours doesn't have what you need. 
It's a good way to discover if a book is worth your investment.


Posted on The Shabby Nest's Frugal Friday 3-26-2011.

Friday, March 18, 2011

Lenten Butter Pie?

This is a classic Lacashire recipe from Britain.  It's a savory pie that uses potato and onion.


It's also known locally as 'Friday Pie' or 'Catholic Pie'. Traditionally, it was served on Fridays to comply with the Catholic rule of not eating meat on that day.  It is typically served with pickled red cabbage or beetroot, likely a good palate-cleanser for this high carbohydrate meal.


Lacashire Butter Pie


Ingredients:

For the Pastry:

240g plain flour (2 scant cups)
60g butter (ample half stick)
60g lard or dripping  (heaping 1/4 cup)
cold water, to bind


 For the Filling:
3 large potatoes
1 onion
6 tbsp butter
1 tbsp water
salt and freshly-ground black pepper, to taste


Butter Pie Preparation:


Method:

Sift the flour into a bowl then dice in the butter and lard.

Rub into the flour with your fingertips, until the mixture resembles coarse crumbs.

Add enough cold water to bring the mixture together as a dough.

Take just over half the dough and roll out on a lightly-floured work surface until large enough to cover the base of your pie dish (this needs to be fairly deep).

Cover the remaining pastry and refrigerate.


Peel the potatoes and cut into large chunks.

Boil in lightly-salted water for about 20 minutes, or until the potatoes are soft, but still hold their shape.

Drain and slice into the pie dish.

Peel the onions and slice into rings then layer these over the potatoes.

Season with salt and black pepper, dot the butter over the top then add the water.

Take the remaining pastry from the refrigerator then roll out until large enough to cover the top of the pie.

Crimp the edges together to seal, pierce the top with a fork then transfer to an oven pre-heated to 180°C (350°F) and bake for 30 minutes, or until cooked through and golden.

Serve with pickled red cabbage and/or beetroot.

It's mandatory to serve this pie with HP sauce or tomato ketchup.

1955 HP Sauce Advertisement

About Me

My photo
As long as I'm on this journey, rambling through life's exhilarating highs and trudging heavily amongst it's incapacitating lows, I might as well share whatever may be gleaned from my little bits of wisdom and my many missteps. No room for judgment from this broken mama. I'm writing from my heart: raw, open, messy, but saved. And I'm still thanking God!